
Introduction
Looking for a sweet treat that’s healthy, easy, and doesn’t require turning on the oven? You’re not alone. In fact, searches for no-bake desserts have increased 78% during summer months, especially for nutrient-packed snacks like these No-Bake Peanut Butter Oat Cups.
These cups are chewy, nutty, naturally sweetened, and require just minutes of hands-on time. Whether you need a grab-and-go breakfast, an afternoon energy bite, or a kid-approved snack, this recipe ticks all the boxes.
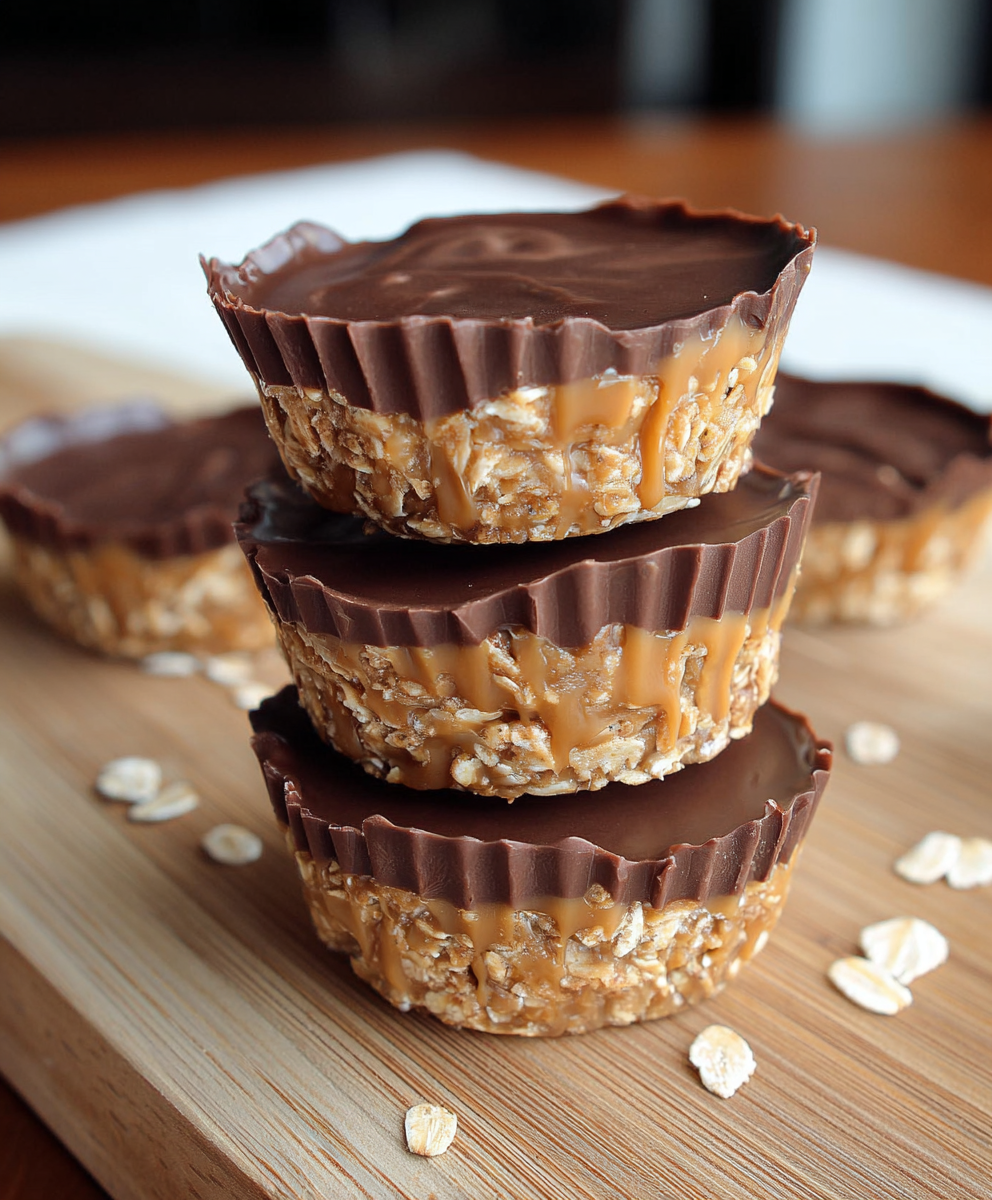
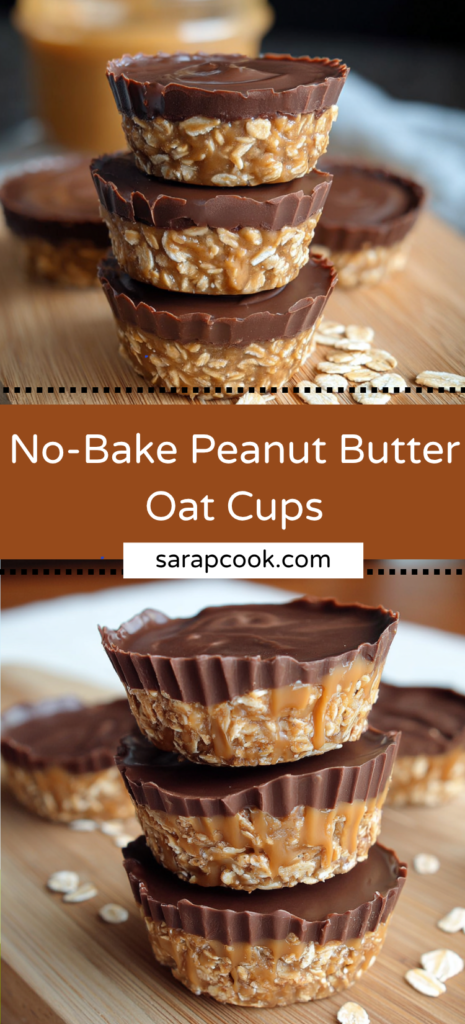
Packed with oats, peanut butter, and chocolate, these No-Bake Peanut Butter Oat Cups are a fridge-stable, freezer-friendly snack with real feel-good flavor.
Ingredients List
These ingredients are pantry-friendly, budget-conscious, and endlessly adaptable.
Base Layer:
- 1 ½ cups old-fashioned oats (gluten-free if needed)
- ¾ cup creamy peanut butter (or almond butter)
- ¼ cup coconut oil (melted)
- ¼ cup honey or maple syrup
- 1 tsp vanilla extract
- Pinch of sea salt
Chocolate Topping:
- ½ cup semi-sweet chocolate chips (or dark chocolate chunks)
- 1 tbsp coconut oil
Optional Add-ins: chia seeds, flaxseed, mini chocolate chips, shredded coconut, crushed pretzels, or chopped nuts.
Timing
- Prep Time: 10 minutes
- Chill Time: 30–45 minutes
- Total Time: 55 minutes
🕒 That’s less than half the time of traditional baked oat bars—perfect for busy lifestyles!
Step-by-Step Instructions
Step 1: Prepare the Muffin Tin
Line a standard muffin tin with 10–12 paper liners or use silicone molds for easy removal.
🧁 This recipe works great in mini muffin pans too for bite-sized snacks!
Step 2: Mix the Base
In a mixing bowl, stir together peanut butter, melted coconut oil, honey (or maple syrup), vanilla extract, and sea salt. Once combined, stir in oats until fully coated.
Step 3: Form the Cups
Spoon the mixture evenly into the muffin liners. Press down firmly using the back of a spoon or a flat-bottomed glass.
💡 Firm pressing ensures they hold together well when chilled.
Step 4: Make the Chocolate Layer
Melt the chocolate chips and coconut oil in the microwave in 20-second increments, stirring until smooth.
Step 5: Top and Chill
Spoon chocolate over each oat base and spread gently. Refrigerate for 30–45 minutes, or until firm.
Step 6: Serve or Store
Once chilled, remove from liners and enjoy. Store leftovers in an airtight container in the fridge.
Nutritional Information
Per Cup (based on 12 servings):
| Nutrient | Amount |
|---|---|
| Calories | 210 kcal |
| Protein | 5 g |
| Carbohydrates | 16 g |
| Sugar | 8 g |
| Fiber | 2 g |
| Total Fat | 14 g |
| Saturated Fat | 5 g |
| Sodium | 90 mg |
🥜 A naturally gluten-free, dairy-optional snack with healthy fats and whole grains.
Healthier Alternatives for the Recipe
- Swap honey for maple syrup to make it fully vegan.
- Use natural peanut butter with no added sugar or oils.
- Replace chocolate topping with dark cacao drizzle or melted almond butter.
- Add chia seeds or hemp hearts for extra protein and Omega-3s.
- Use sunflower seed butter for a nut-free option.
Serving Suggestions
- Serve chilled with coffee or tea for an energizing mid-morning treat.
- Add to a snack board with fruit, nuts, and yogurt.
- Pack in lunchboxes or snack packs for school or work.
- Dip halfway in melted chocolate for a dessert-style twist.
- Sprinkle flaky sea salt or toasted coconut on top for visual flair and flavor.
Common Mistakes to Avoid
- Using quick oats: They won’t hold together as well and get soggy.
- Not pressing down firmly: Loose cups can crumble when chilled.
- Adding too much liquid sweetener: Can cause the cups to be overly sticky or not set properly.
- Skipping the chill time: The cups won’t hold their shape and may fall apart.
- Using chocolate without coconut oil: Makes spreading harder and creates a thicker, more brittle top layer.
Storing Tips for the Recipe
- Fridge Storage: Keep in an airtight container for up to 1 week.
- Freezer Friendly: Freeze for up to 3 months. Thaw at room temp for 10–15 minutes before eating.
- Use parchment paper between layers to prevent sticking.
🧊 Make a double batch and freeze half for future snack emergencies!
Conclusion
These No-Bake Peanut Butter Oat Cups are simple, satisfying, and endlessly versatile. Whether you’re meal-prepping, fueling up post-workout, or just curbing a sweet craving, these protein-packed treats are as easy to love as they are to make.
🥣 Try the recipe, leave a review, comment with your add-ins, and subscribe for more healthy snack ideas and no-bake dessert inspiration!
FAQs
Can I use almond butter instead?
Absolutely. Any nut or seed butter will work—just ensure it’s creamy and not too runny.
Are they safe for kids?
Yes! Use a nut-free butter like sunflower seed butter for allergy-friendly school snacks.
Can I leave out the chocolate topping?
Yes, or substitute with a drizzle of peanut butter, yogurt coating, or jam.
Do they travel well?
Yes! Store in a cooler or insulated lunch bag if you’re taking them out in hot weather.
How can I make them higher in protein?
Add a scoop of protein powder to the base mix, or stir in hemp seeds or crushed peanuts.
